CLOUZ HOUZ DESIGN GUIDES - What’s your style?
TAKE THE QUIZ
Design

Brass Rails At The Bar!

The Brass Rail Detail That Took Our Bar to the Next Level

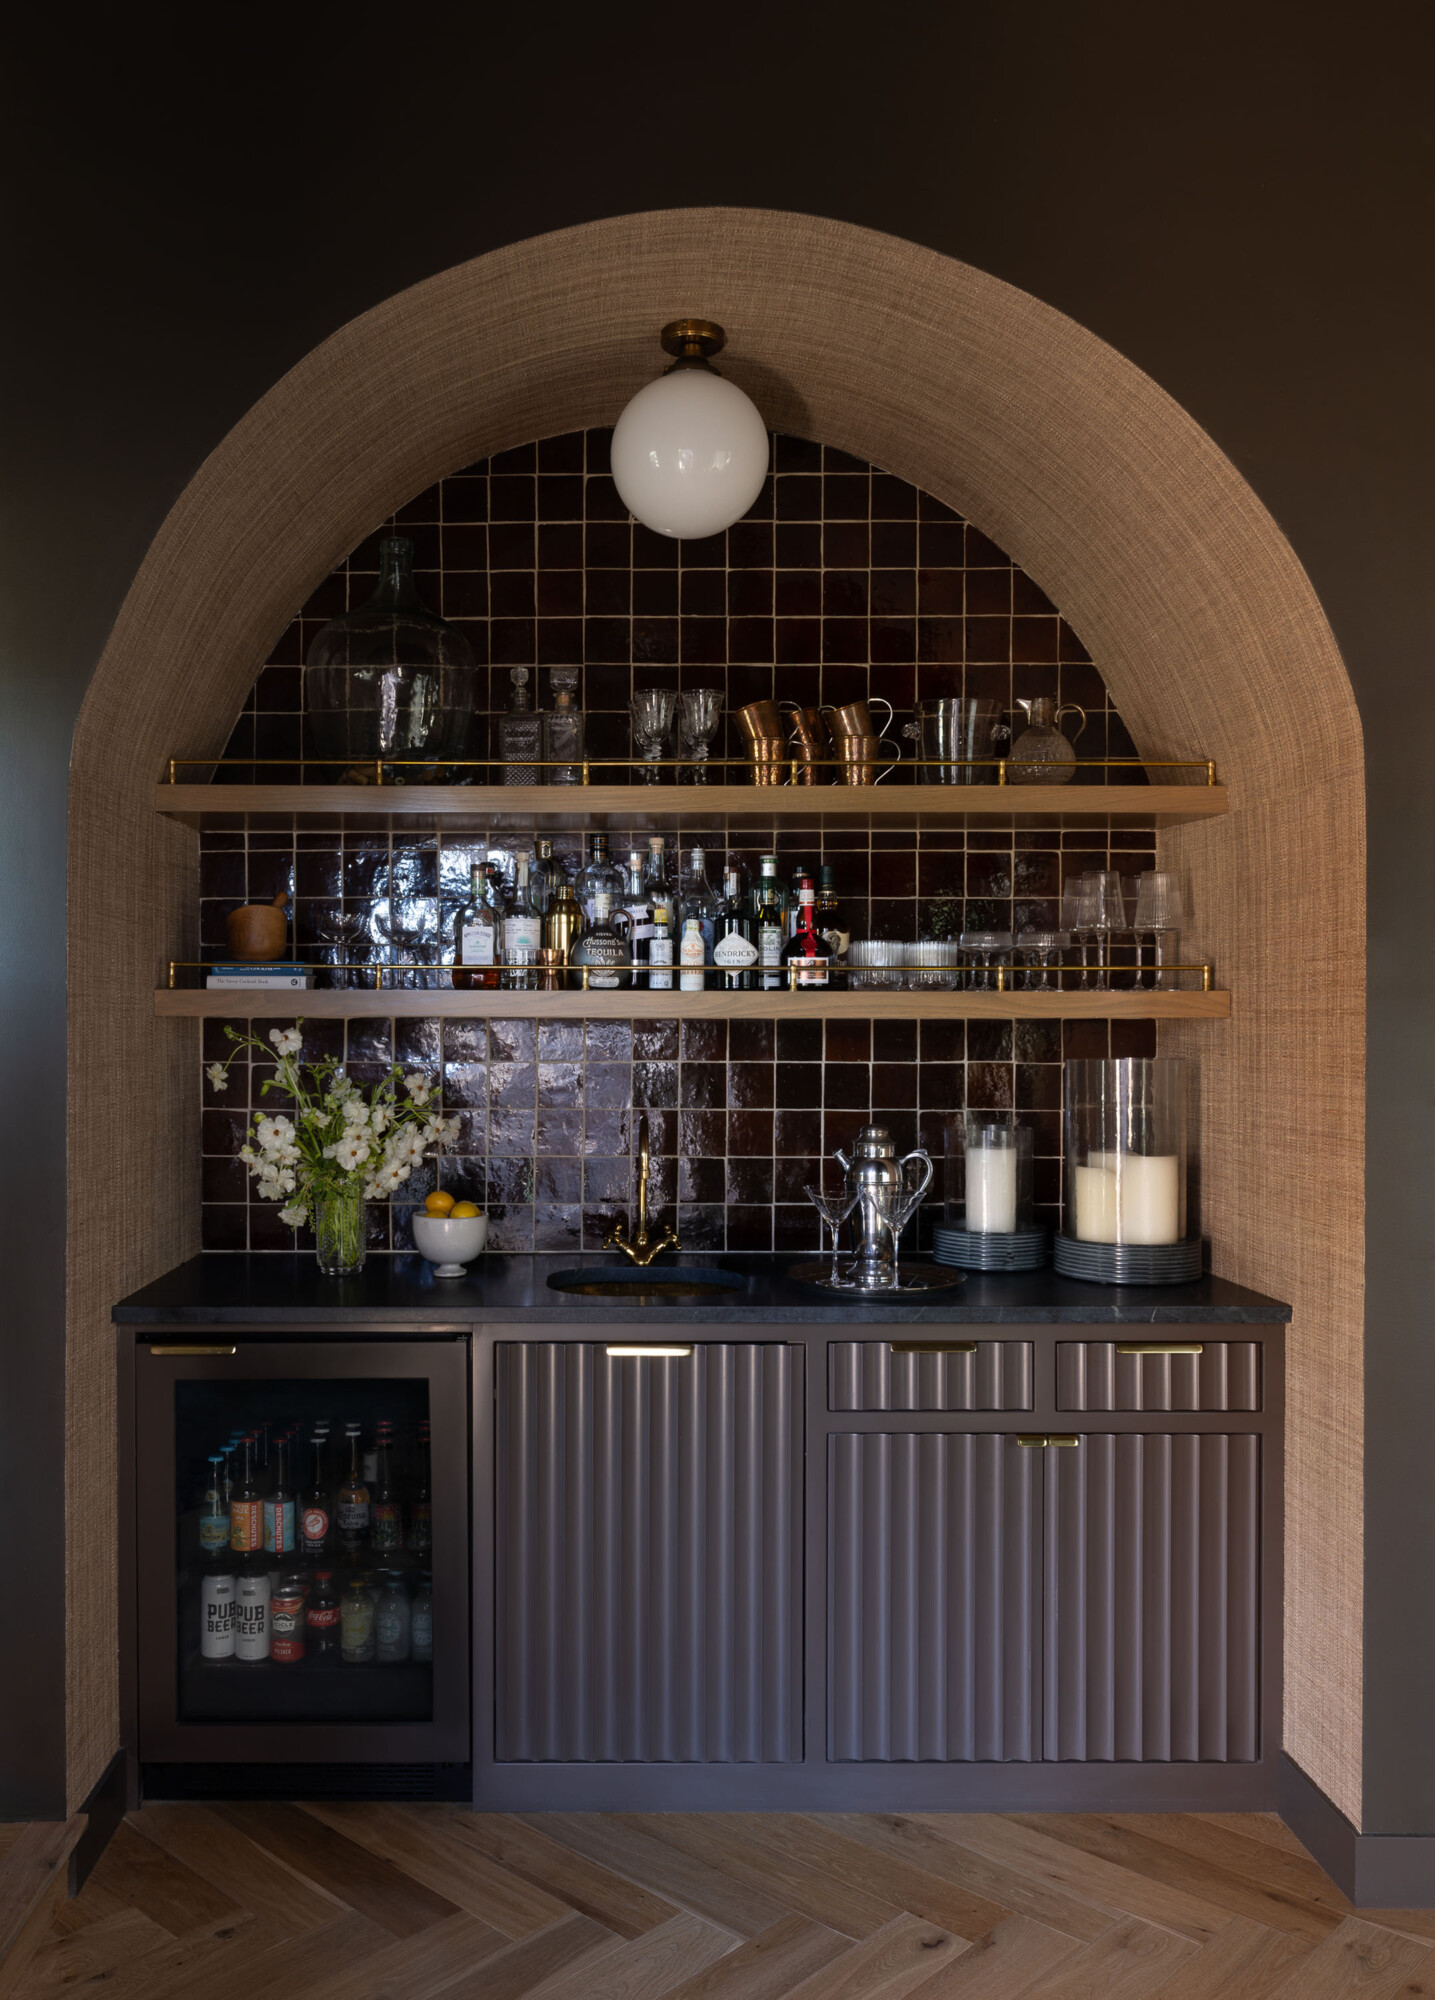
When we started designing our wet bar, I knew from the very beginning that I wanted a space that felt intentional and complete. Not just a functional corner, but something that looked and felt polished. Enter: brass shelf rails.


A classic brass gallery rail mounted on a wooden shelf, perfect for adding a refined and structured look to bar shelving, kitchen open shelves, or built-in cabinetry.


I’ve had my eye on these for years, obsessing over how they make even the simplest shelves look built-in and custom. They add that extra layer of detail that makes a space feel considered and high-end. And, now that they’re in? I can confidently say they were worth every bit of effort.

We get questions all the time about these rails—what they’re for, where we got them, how they’re installed, and if they’re purely decorative or actually functional. So, I thought it deserved a spot on the blog and I’m here to share all the deets so you can achieve this look!


High Desert Tumalo Ranch | Bend, Oregon | Wet Bar | Home Bar Design | Archway | Wallpaper | Zellige Tile
Photo: Zee Wendell

Brass Gallery Rails | Brass Cabinet Hardware | Brass Faucet | Zellige Tile | Globe Flush Mount | Crystal Decanter | Copper Mule Mugs | Ribbed Coupes |

Cocktail Shaker | Tall Hurricanes | Ceramic Footed Bowl | Vintage Silver Tray | Brass Hammered Sink


If you want to shop our wet bar, as always, you can find everything—and more—over on our LTK. We’ve linked the exact products, along with some similar finds, to give you a couple of different options. And, if you love to shop our finds and obsessions, make sure to subscribe to our weekly newsletter. We share our top five products of the week, plus plenty of other good things—design tips, recipes, inspiration for refreshing your space, and more.


Why We Chose Brass Rails for Our Bar

For our wet bar, these rails made perfect sense. We wanted open shelves to display liquor bottles, glassware, and bar accessories—but without something to define the space, they felt like they were missing a final touch.

Here’s why brass shelf rails specifically worked so well for this setup.

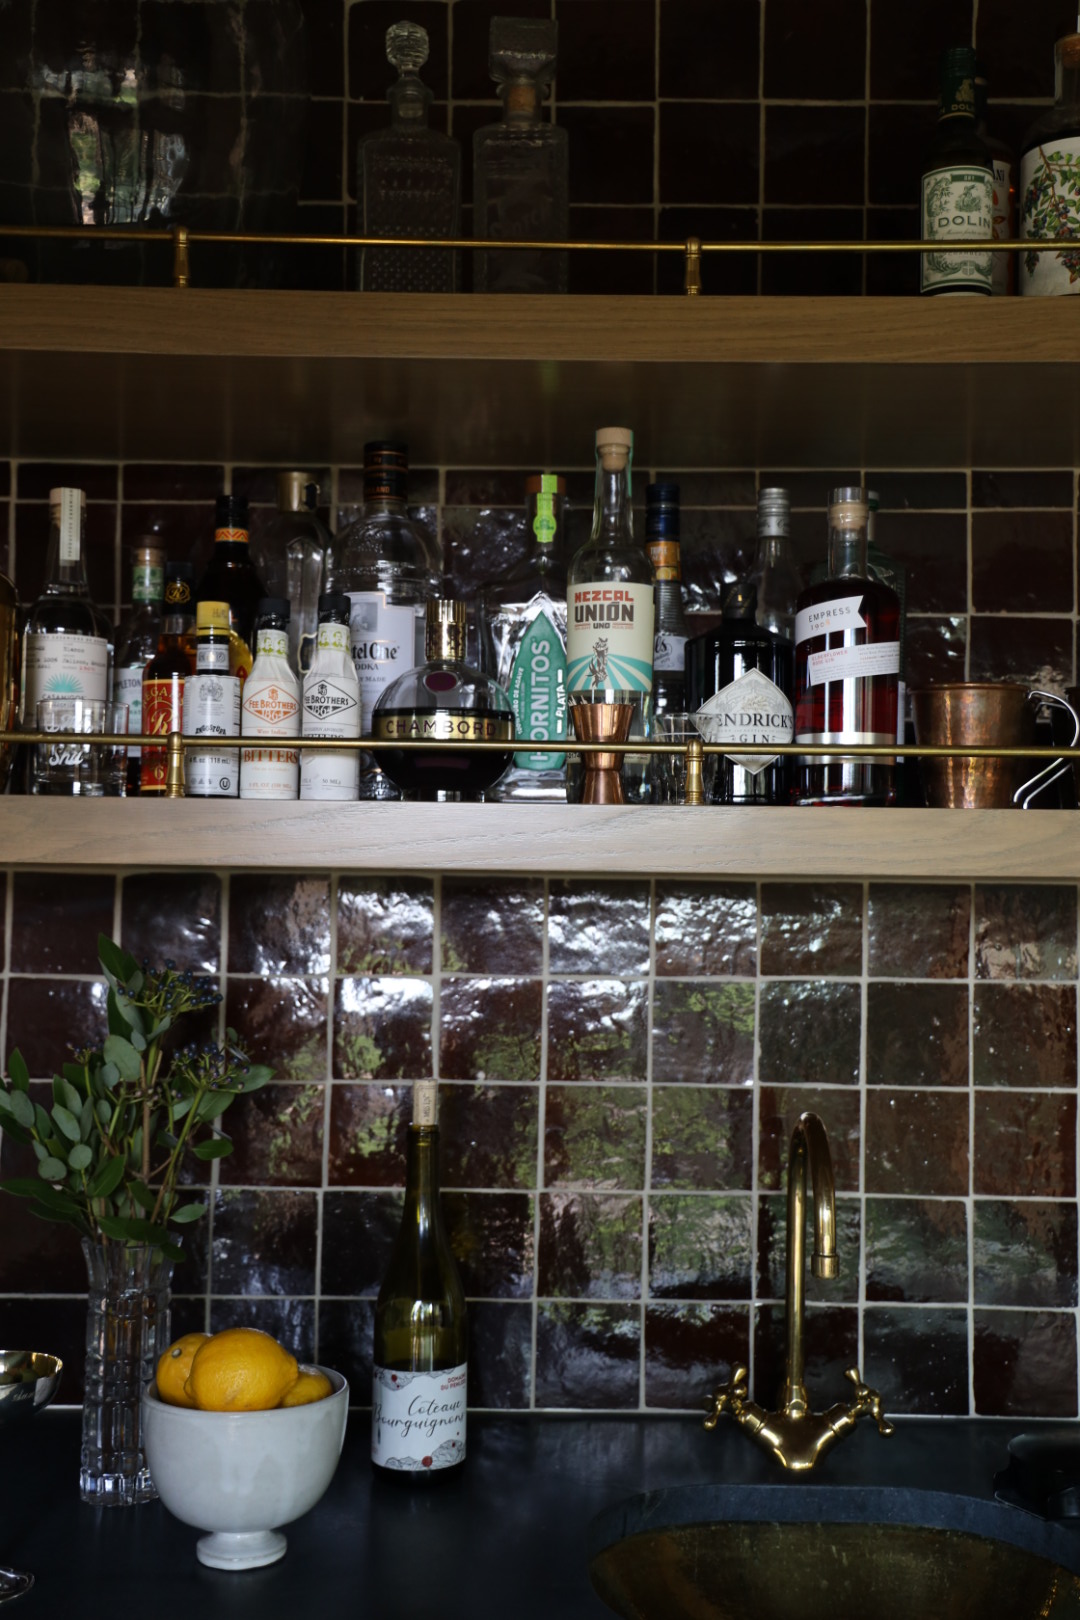
They add structure. Liquor bottles, glassware, and decor are all contained neatly within the rail, instead of looking like they’re floating in an empty space.

They create a “built-in” look. These shelves are just standard floating wood shelves, but adding the rail makes them feel custom—like they were designed specifically for this bar.

They’re both practical and decorative. While we mainly added them for looks, they do help keep bottles and décor from shifting around too much.

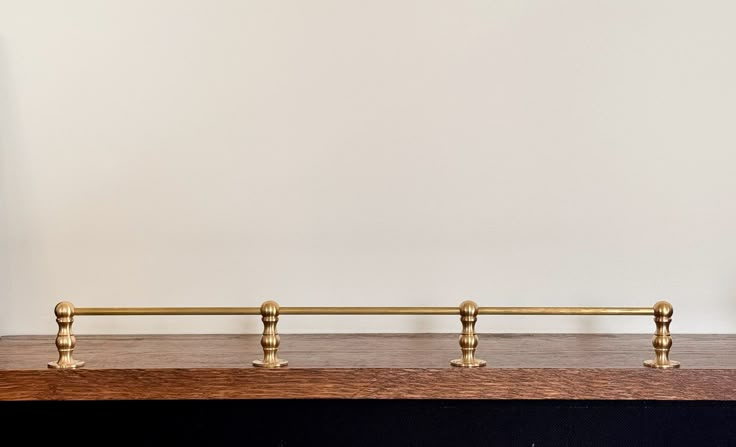
Unlacquered brass = the perfect warm patina. We went with unfinished brass, which means it started off bright and shiny but will darken and develop a lived-in patina over time.


A stylish home wet bar featuring open wood shelves with brass gallery rails, a curated selection of liquor bottles, and vintage glass decanters. The backdrop is deep brown glossy zellige tile, adding depth and texture. Below, a dark stone countertop houses a hammered brass sink and an unlacquered brass bridge faucet. A ceramic bowl filled with fresh lemons and a glass vase with greenery add a natural touch, while a bottle of wine completes the effortlessly styled bar setup.
Photo: Bozeman Media Design

Where We Ordered Our Rails

We sourced our rails from ‘The Brass Addict’ on Etsy, and they’re completely customizable—which is key because every shelf setup is different. Unlike big-box store options that come in fixed sizes, these were made to fit exactly to our shelves.

Here’s what you need to know before ordering:

  • Measure, measure, measure. The vendor provides a sizing guide, which helps determine the exact length you need, how many center posts you’ll need for support, and whether you want end caps to “close off” the rail.
  • Decide on your finish. We went with unlacquered brass, which ages over time and gives that antique, lived-in feel. But, if you want something that stays bright and polished, you can choose lacquered brass or even a different metal.
  • Think about where you want them. Do you want a rail just along the front of the shelf? Or do you want one along the sides too, for a fully enclosed look?


A curated mood board featuring brass rail inspiration in various home settings. The collage showcases elegant brass gallery rails used on open shelving, including a kitchen with a marble backsplash and hanging copper cookware, a butler's pantry with warm wood tones and neatly arranged copper accents, and a charming nook with sage green shelves and brass brackets. Close-up shots highlight the details of unlacquered brass rails, demonstrating how they add functionality and a refined, built-in look to shelving. A sophisticated blend of European-inspired design and timeless elegance.


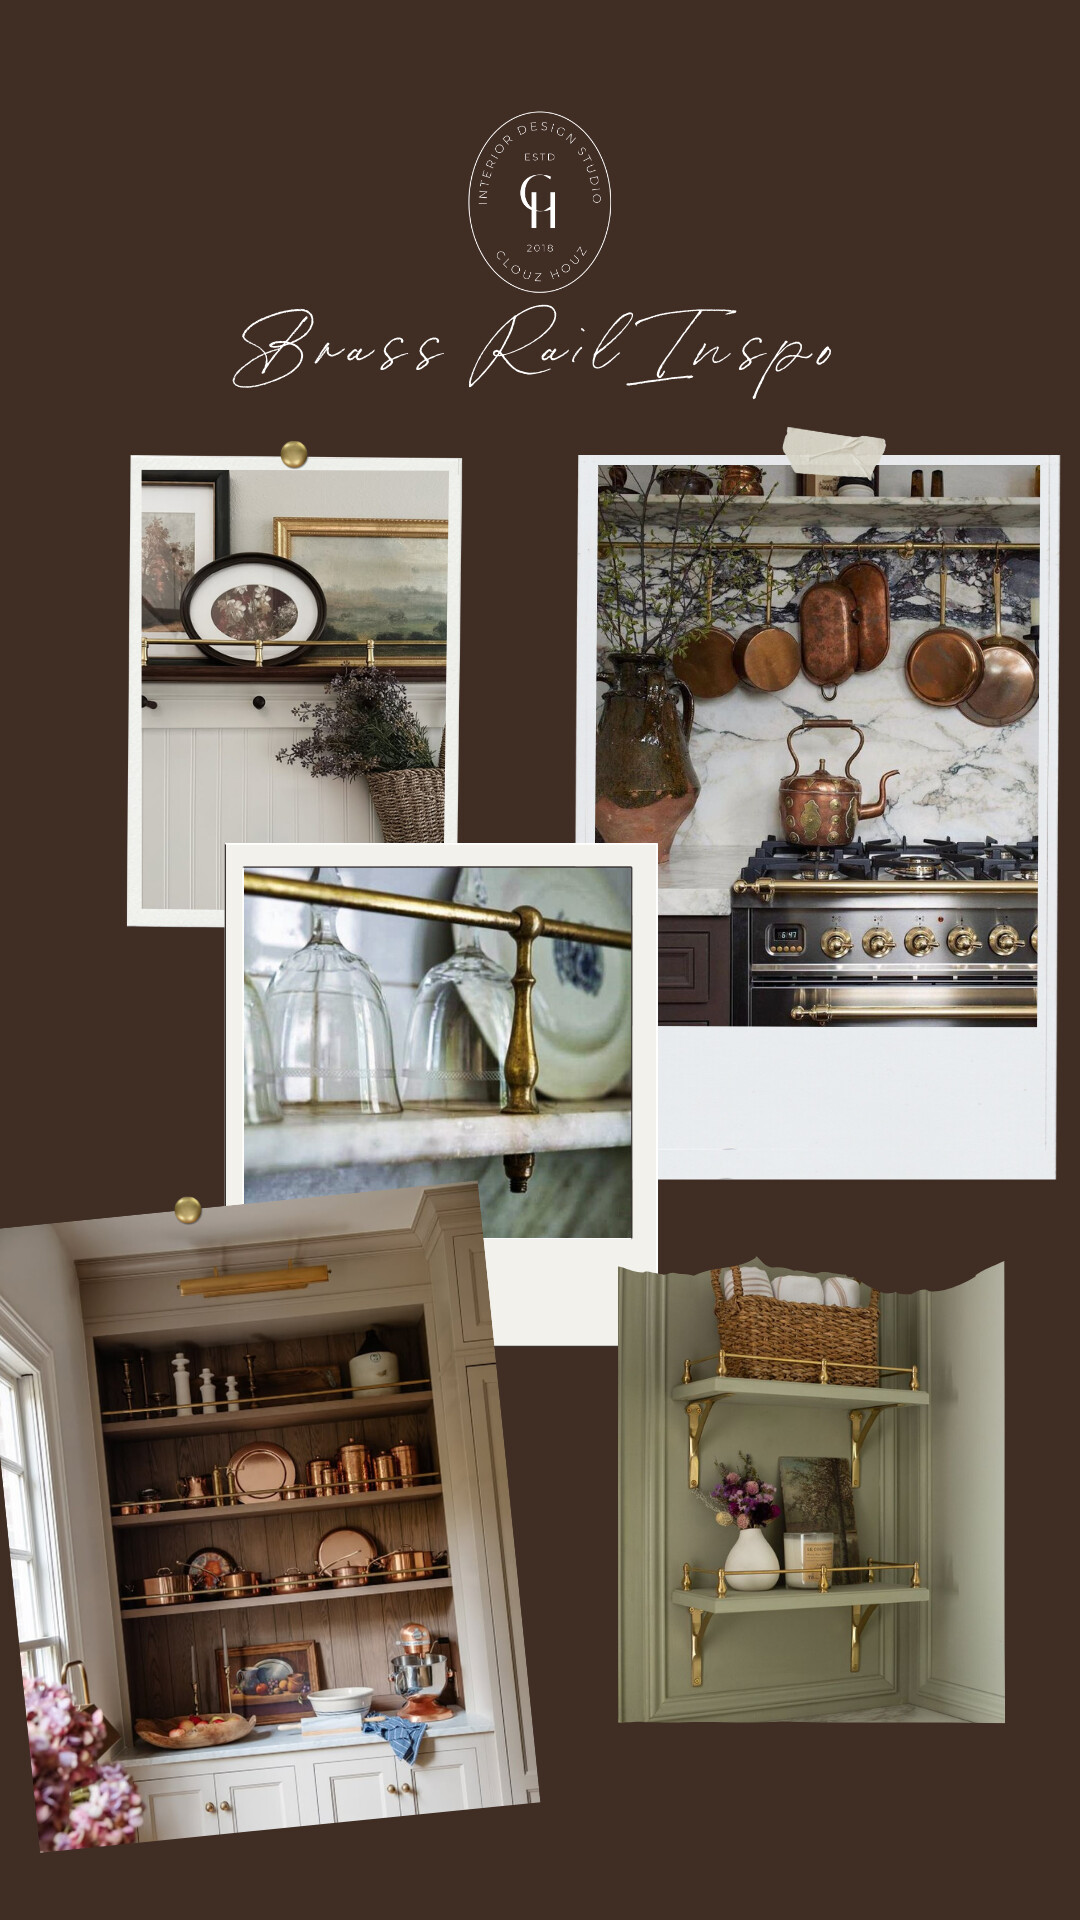
Other Places You Can Use Brass Rails

I think many people assume these are just for bar shelves. But, they can work in many other places around the house!

Kitchen Open Shelving – If you have floating shelves in your kitchen, a brass rail can help keep dishes, glasses, and cookbooks in place while adding a polished look.

Built-In Hutch or China Cabinet – Do you have open shelving in a hutch? If so, a rail can add an extra layer of detail, making it feel more like a high-end furniture piece.

Bathroom Shelves – Keep bottles, candles, and small décor items contained on floating shelves.

Living Room or Office Shelves – Use rails on a bookshelf to section off styling areas, or to frame in decorative objects.

Media Console or Entryway Table – If you have an open console with a bottom shelf, adding a brass rail can help create a designated space for books, baskets, or decorative objects.


The Evolution of Our Bar Area

One thing I love about this space is how much it has evolved. At first, we designed it with entertaining in mind, imagining it as the go-to spot for mixing cocktails when friends and family came over. And yes, it absolutely serves that purpose—we’ve curated a collection of spirits and glassware that make every gathering feel a little more special. But, over time, we’ve found ourselves using it in many other ways.

It has become a natural snack station when hosting, a convenient spot to lay out a cheese board or small appetizers so guests can easily help themselves. Surprisingly, it’s also turned into a little morning coffee nook. I know—a bar for coffee? But when we have guests staying with us, it’s the perfect setup for a small coffee station, making it easy to grab a cup without crowding the kitchen.

And, even when it’s not in use, it still serves as a styling moment. The layered bottles, warm brass accents, and collected glassware give it a curated feel that makes the space feel lived-in and intentional. It’s a functional space, yes, but it’s also one of those corners of the home that just looks good, even when it’s just sitting there.

Shop Our Bar Setup

If you love the look and want to add something similar to your home, here’s where you can find the pieces we used:

Join the Conversation

get inspired
#clouzhouz
follow along
@clouz_houz
Merry Christmas Eve, friends! I’m sharing this from the archives (since our home is still a construction zone 🤪)... wishing you all a very Merry Christmas with your loved ones.❤️
20k. Wow. Feeling a little surreal over here (and right before Christmas!). Emma surprised me with this cake today and it honestly made me pause and take it all in. This journey has been nothing without you all (this community) showing up, supporting, growing with me. I’m so grateful for every message, interaction, and tiny bit of love along the way.
And I’ll be honest... it’s not always easy showing up here every day and sharing so many pieces of our lives. You don’t see everything, and that’s okay. But what’s real is this connection and the people on the other side of the screen.
Here’s to all of you. Thank you for being here, for cheering us on, and for making this space feel like something worth building.❤️
After designing and remodeling so many bathrooms, here are 5 mistakes I’ll never make again:
1. Stopping tile too low on the wall.
Tiling only part way up can make a bathroom feel choppy and visually shorter. Taking tile higher (or all the way up in key areas) instantly feels more custom and elevates even the smallest space.
2. Choosing form over storage.
A pretty pedestal sink with nowhere to hide anything... I’ve learned my lesson. Vanities with drawers, medicine cabinets, and smart niches keep your counters clear and make your bathroom actually livable. For example, pretty pedestal sinks have my heart — but they have zero secrets. If you truly love the look, add a tailored sink skirt to hide essentials, or do what we’re doing in our own project: bringing in an entire wall of IKEA PAX built-ins for overflow storage. Desianers think hard about lifestyle... because a beautiful bathroom that doesn’t actually work never stays beautiful.
3. Using the wrong grout color.
Bright white grout on a busy floor or in a shower is a cleaning nightmare. A softer, mid-tone grout is more forgiving, ages better, and lets the tile shine instead of the lines.
4. Cheap, overly shiny hardware and fixtures.
Nothing dates a bathroom faster than ultra-shiny, lightweight hardware. A tip I give clients: always look for weight and finish depth. Polished nickel with a warm undertone, unlacquered brass that patinas beautifully, or even aged bronze instantly elevates a space. Spend once and avoid upgrading again in two years.
5. Relying only on overhead lighting.
One can light = harsh, flat, unflattering. Layered lighting changes everything. Add sconces at face level (ladies... this is a game changer for getting ready), plus a decorative fixture or even a candle for a softer, moodier feel.
If you’re planning a remodel or want help avoiding these mistakes in your own home, send me a DM — we’d love to help you design a bathroom you’ll love for years🤍
“Designers are expensive.” That’s the public opinion... and sometimes, it’s true. But it’s also the reason we exist. 
A designer’s fee is almost always less than the cost of redoing things that weren’t done right the first time.
We see it all the time. Clients come to us after plans are finalized, materials are ordered, and the space is already under construction. By then, it’s much harder (and more expensive) to course-correct. Details like lighting placement, ceiling heights, tile layout, and even outlet locations all impact the final design. And when we’re part of the process early, those decisions work together instead of against each other.
Working with a designer isn’t just about how your home looks.. It’s about how it feels and functions. Our role is to bridge the gap between vision and execution, to make sure every decision supports the next one.
If you’re in the early stages of building or renovating, this is your sign to bring design in from the start. It’s an investment in doing it once, and doing it beautifully.
Inquire through our site (link in bio) to start your project!
Headed back to Oregon today and scrolling through old Christmas clips like the nostalgic, obsessed person that I am.😂 It truly never fails to be the coziest place during the holidays.
We chose the PNW this year partly for the peaceful vibes... partly because our renovation is unhinged right now. And MOSTLY because I wanted to put up a tree. 
Luckily we have a fake one in storage. No ornaments, just twinkle lights and vibes. I’ve got a few simple tricks to make it feel special for our family.
Where are you celebrating this year? Traveling? Staying home? I love hearing what this season looks like for everyone.